
Restoring a lawn is not about making the garden perfect overnight. It is a systematic approach to soil health, proper seeding and consistent long-term care so your existing lawn can thicken, recover and stay healthy.
Key Takeways
-
Lawn restoration revives an existing lawn by fixing soil issues, removing weeds and debris, overseeding with quality grass seed and improving lawn care.
-
A complete lawn renovation is usually only worth it when more than about 40% of the existing grass is dead grass, weeds, moss or bare soil.
-
The best windows are mid-spring or early autumn, with late summer to mid-autumn ideal for most cool-season lawn types.
-
The core process is: mow the lawn low, remove thatch and moss, aerate, apply top dressing, sow lawn seed, water regularly and protect new seedlings.
-
Lasting results come from correct mowing height, seasonal nutrients and watering that supports deep roots.
What Is Lawn Restoration (and When Is It Enough)?
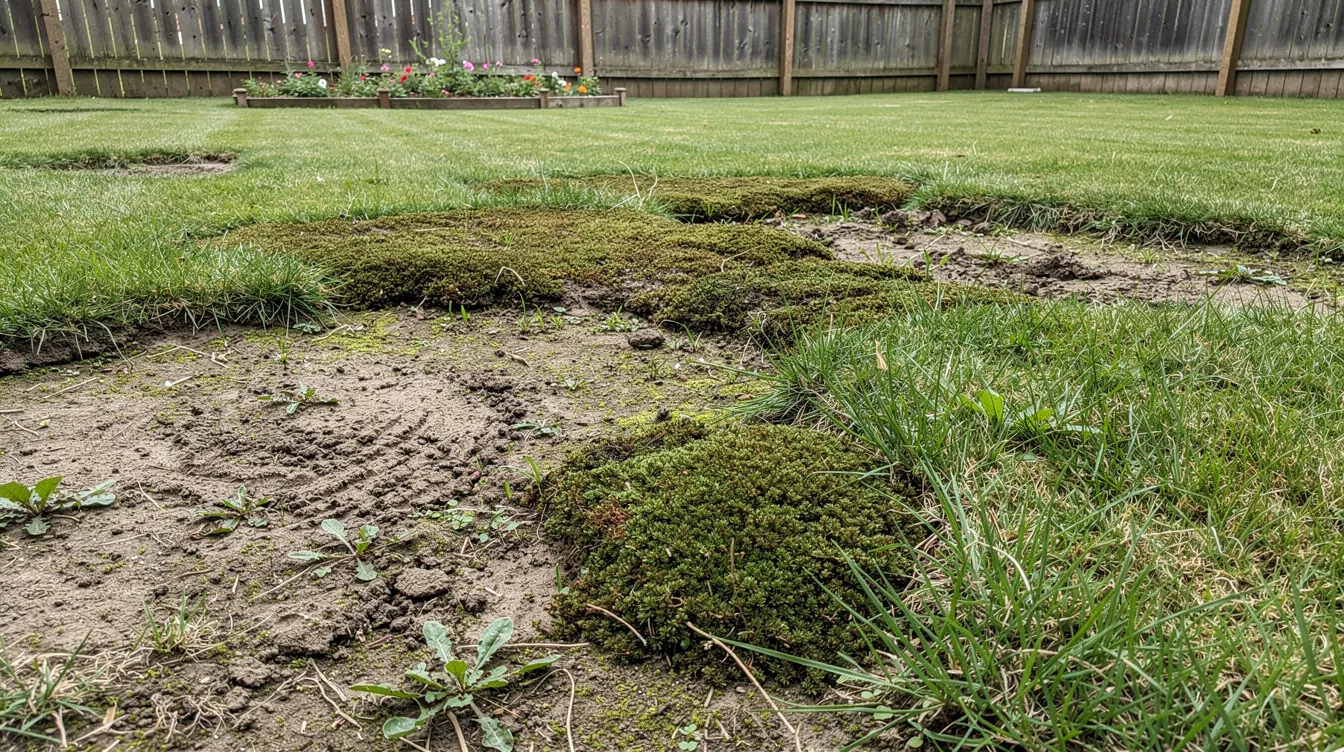
Lawn restoration means improving an old lawn without automatically digging everything up. It suits thinning grass, moss, bare patches, pet damage, compaction and an existing lawn that still has enough good turf to save.
The best methods for restoring a damaged lawn are overseeding for thinning grass, patch repair for bare spots, and total renovation for severely degraded yards. Light lawn renovation may only need feeding, lawn overseeding and small repairs. Deeper work includes scarifying, aerating and reseeding bare areas.
As a rule, restoration works best when at least 60% of the existing grass is still alive and worth keeping.
Your lawn is a good candidate if:
-
most grass plants are green after rain
-
damage is patchy, not total
-
moss and thatch can be removed
-
the ground is not full of rubble
-
roots are present below the surface
Do You Need a Complete Lawn Renovation or Just Repair?
Decide before buying new grass seed or hiring machines. Walk the lawn in dry daylight, mark bare patches, moss and weeds, then estimate the damaged lawn area. In a 100–200 m² garden, 40 m² of bare or weedy ground is a warning sign.
Use this rule of thumb: if more than about 40% is bare, dead, mossy or weed-dominated, complete lawn renovation or a new lawn is often more effective. The RHS also separates local repairs from whole-lawn renovation in its lawn repair guidance.
Choose partial renovation when damage is localised, such as a dog run, goal mouth or path to a shed, while the rest of the existing grass is dense and responds to feeding.
Decision checklist:
-
Under 40% damaged: repair and overseed
-
Localised bare areas: patch repair
-
More than 50% weeds: stronger weed control or full renovation
-
Deep shade, clay soil drainage failure or rubble: consider starting again
-
Severe compaction: aerate first, then judge recovery
Best Time of Year to Restore a Lawn
Grass biology matters more than convenience. For cool-season lawns in the UK, Ireland, northern USA and Scandinavia, the ideal window is mid-August to late September, when summer warmth remains in the soil but rain and cooler air help seed germinate.
Early spring, especially late March to late April, is second best for lighter lawn renovation. The ideal times for lawn restoration activities are mid-spring or early autumn when soil temperatures are favorable, generally above 8–10°C for cool-season seed.
Avoid July heatwaves, frozen winter ground, very wet weather and waterlogged wet weather. Heavy scarifying in mid-winter can damage crowns, while seed in hot dry weather may simply die.
Recap:
-
Autumn: major work
-
Spring: lighter repair
-
Avoid: heat, frost and saturated soil
Pre-Restoration Checks: Diagnose Problems Before You Start
Soil preparation is essential for successful lawn restoration. Before restoring a lawn, dig a 10–15 cm inspection hole with a trowel. Check whether the soil is loam, compacted clay soil or free-draining sandy soils. Look for stones, builder’s rubble, black layers or poor top soil.
Measure thatch by cutting a small plug with a knife. More than 1–1.5 cm of thatch can choke roots and hold moisture against the crown; the University of Maryland notes excess thatch can increase stress and disease risk in lawns (source).
Test compaction with a garden fork or screwdriver. If it barely enters the ground, air, water and nutrients are not moving properly.
Record:
-
shade patterns through the day
-
wet spots after rain
-
trodden routes
-
pet toilet areas
-
moss return
-
weed types
Step-by-Step Guide: Restoring a Tired Existing Lawn
This process suits lawns where existing grass still covers more than half the surface. Allow one weekend for mechanical work, then 4–8 weeks of after-care.
Step 1: Mow the Lawn Low and Clear the Surface
First, mow the lawn low to about 20 mm without scalping. This exposes the soil surface and helps tools reach thatch instead of long grass blades.
-
Lower the mower gradually if the old grass is long
-
Use a sharp blade
-
Collect clippings, sticks and leaves
-
rake loose debris from the surface
-
remove weeds before seeding
Removing existing weeds and debris is a crucial step in lawn restoration. The lawn will look rough at this stage.
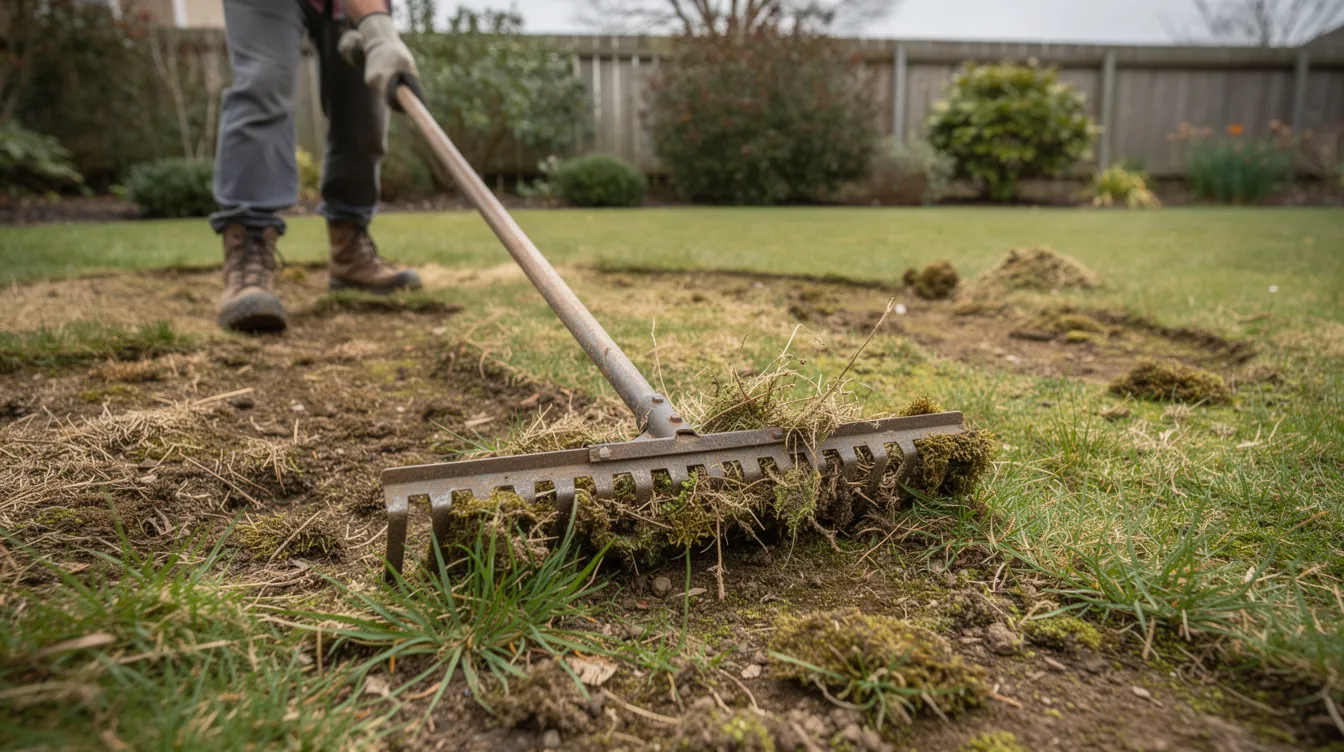
Step 2: Scarify to Remove Thatch, Moss and Old Lawn Matter
Scarifying cuts into the surface and pulls out moss, dead grass, thatch and old lawn matter.
-
Use a spring-tine rake for 30–40 m² lawns
-
Hire an electric scarifier for larger areas
-
Work north–south, then east–west
-
Aim for visible soil between grass plants
-
Compost clean debris, but bin diseased or seedy waste
Do not panic if the lawn looks very bare afterward. You are making space for new seed.
Step 3: Aerate the Soil to Relieve Compaction
Compacted soil restricts roots, water and air. Aerating the lawn before seeding and top dressing is recommended to relieve soil compaction, allowing new seed roots to penetrate the soil more easily.
Use a garden fork every 8–10 cm on small lawns. For heavy wear or clay, use a hollow tine aerator, which removes cores. Utah State University explains that core aeration is especially useful for compacted turf (source).
Aerate when soil is moist, not wet or frozen. Remove cores before dressing.
Step 4: Top-Dress to Improve Soil and Level the Lawn
Top dressing means applying a 5–10 mm layer of mix over the lawn. Top dressing involves applying a mix of sand, soil, and compost to improve drainage and provide nutrients for new seedlings.
A good quality top dressing should ideally contain organic matter to retain moisture and some sand to help level out the lawn surface. Try 3 parts sandy loam, 6 parts sharp sand and 1 part peat-free compost. Add more loam for sandy soils and more coarse sand for clay.
Spread small piles, then brush them in until only grass tips show. This also softens small bumps and improves water holding capacity without burying turf.
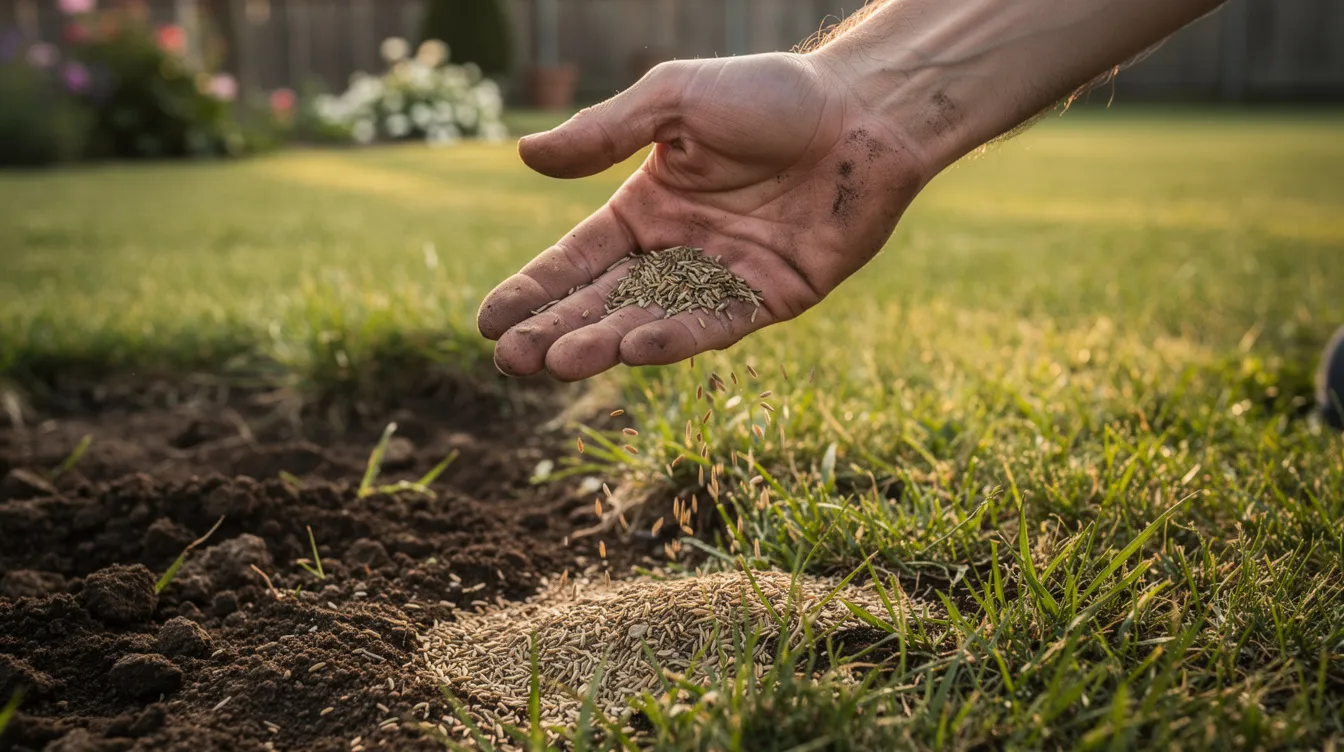
Step 5: Overseed with the Right Lawn Seed Mix
Match grass seed to the existing lawn for a consistent look, or upgrade with hard-wearing lawn seed. Choosing the right grass type is crucial for lawn success, as different species have varying tolerances to drought, shade, and foot traffic.
For optimal growth, select grass seed that matches your local climate and soil conditions, as well as the sun exposure of your lawn area.
-
Sow about 25–35 g/m² for lawn overseeding
-
Use more new grass seed on bare patches
-
Apply half north–south and half east–west for even coverage
-
Gently rake seed into the top few millimetres
-
Mix seed with fine compost for edges and bare spots
Good seed-soil contact will improve seed germination.
Step 6: Watering and Protecting New Seedlings
Even the best lawn seed fails without moisture. Watering should be done daily to keep the topsoil consistently damp during germination.
-
Keep the top 1–2 cm moist for 10–14 days
-
Water early morning or evening
-
Use a fine spray, not a heavy jet
-
Keep pets, play and furniture off
-
Cover with netting if birds steal seed
New grass may germinate in 5–10 days in warm soil, or 2–3 weeks in cooler spring conditions.
Step 7: First Mows and Early Feeding
Mowing should only be done once the new grass reaches a height of about 8 cm (3 inches). For first mowing, cut back to about 5–6 cm with sharp blades.
Never remove more than a third of the leaf in one mow. It is recommended to apply a nutrient-rich starter fertilizer to promote root development in newly seeded areas, but avoid excessive nitrogen that forces weak new growth.
When and How to Carry Out a Complete Lawn Renovation
A complete lawn renovation means killing or removing the entire existing lawn and re-establishing grass from seed or turf. It is a big job, but sometimes it is the cleanest route.
Use it when the lawn is more than 60% weeds or bare, the soil is badly compacted, or the garden was built on poor subsoil. You can use a non selective herbicide, following local rules, then wait 10–14 days for old grass and weeds to die back. Or strip turf physically with a cutter.
Then rotovate, level, firm, rake and sow new lawn seed or lay turf. Start in late August if possible so seed is in by mid-September.
Ongoing Lawn Care After Restoration: Keeping Results Long-Term
Restoration gets the lawn back in good shape; lawn care keeps it there. Mow little and often, raising the height in summer drought. Never remove more than a third of the blade.
Feed in spring with nitrogen, in summer with a balanced feed, and in autumn with more potassium for winter resilience. Established lawns need deep watering once or twice weekly in drought, not daily sprinkling; deeper roots mean less watering later.
Monthly checks:
-
colour and density
-
weeds and moss
-
thatch depth
-
wet patches
-
bare areas after wear
Choosing Grass Seed and Products for Your Lawn
High-quality grass seed mixtures typically contain robust grasses that can better withstand environmental stresses and promote a thicker lawn.
Use ryegrass blends for family gardens, fine fescues for ornamental lawns, and shade mixes under trees or north-facing walls. Modern self-repairing mixes help knit small bare patches together. For drought-prone sites, choose fescue-rich mixes; for heavy use, choose tougher ryegrass-based lawn types.
FAQ: Restoring a Lawn
How long before a restored lawn looks good?
A green haze often appears within 10–21 days. Most lawns look much better after 6–8 weeks, but full thickening can take a growing season.
Can I walk on the lawn during restoration?
Keep traffic minimal until seedlings reach 7–8 cm and have been mown once or twice. Use boards if access is unavoidable.
Is turf better than seed after full renovation?
Turf gives instant cover but costs more. Seed is cheaper, offers more choice, and works well if you can water regularly for the first month.
What if weeds keep coming back?
Some weed seeds germinate after soil disturbance. Hand-remove young weeds early, mow correctly, feed well and encourage dense healthy grass.
Start by walking your lawn, marking the problem areas and choosing the lightest renovation that fixes the cause.


