


You have moved into a new house. The garden looked reasonable in the photos. But up close the lawn is patchy, yellowing, barely growing, or a combination of all three.
This is one of the most common lawn problems in the UK and one of the most frustrating, because the lawn looks so bad despite the fact that you have done nothing wrong. The problems were there before you arrived, built into the way the lawn was installed.
This guide explains exactly why new house lawns fail, what specifically is wrong with yours, and the correct way to fix it so that you do not spend the next two years cycling through products that only partially work.
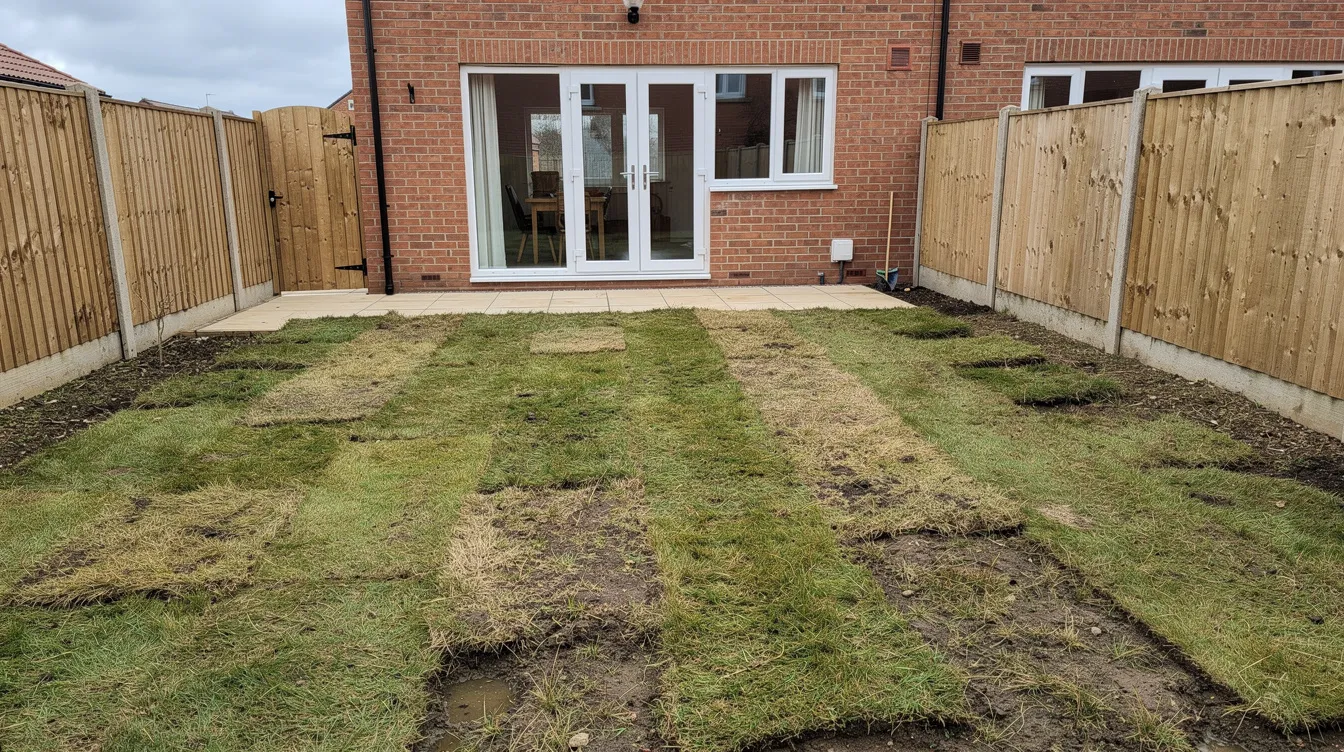
Why New House Lawns Almost Always Have Problems
Builder-grade turf is not designed to last
The turf laid by developers and house builders is chosen for speed and cost, not quality. It is typically cut from commercial turf farms, rolled and transported, then laid within a very short window. The grass varieties in builder turf are often annual ryegrass-heavy mixes designed to look green quickly rather than establish a deep, persistent root system.
Annual ryegrass germinates fast and looks healthy in the short term, but these mixes are also more susceptible to thinning in shade or under winter stress. Within 12 to 18 months, without the deep perennial root structure that a quality seed mix develops, it thins out. The lawn that looked passable when you moved in deteriorates steadily in the first year or two of your ownership through no fault of yours.
The ground preparation and soil preparation was inadequate
This is the more serious structural problem and the one most commonly missed.
To build a house, the entire site is excavated. The topsoil, which contains the organic matter and biology that supports plant growth, is typically removed, stockpiled or disposed of. Once building is complete, the site is often left with poor ground preparation as well as only a thin layer of topsoil or subsoil redistributed across the garden before the turf is laid.
The result is turf sitting over heavily compacted construction subsoil with a minimal topsoil layer. The subsoil is the opposite of what grass needs: low in organic matter, poor in drainage, and compacted by heavy machinery during construction, leaving compacted ground beneath repeated traffic.
Grass roots cannot penetrate significantly compacted subsoil. They stay shallow, close to the thin topsoil surface, which makes the lawn vulnerable to drought stress, waterlogging, moss invasion, and poor colour. In new build gardens, these are the main causes of failure: inadequate preparation and a hard layer below. This is not something that lawn treatments applied to the surface can overcome without addressing the underlying compaction.
According to the Royal Horticultural Society, poor soil preparation is the primary cause of lawn failure in new build properties. The RHS recommends deep cultivation of at least 30cm and incorporation of organic matter before any lawn is laid on a new build site, a standard that most developers do not follow and one that helps restore soil structure damaged by construction and poor reinstatement.
Moss establishes quickly in these conditions
Compacted soil with poor drainage and thin grass coverage is the ideal environment for moss. Moss does not need the conditions that grass needs. It thrives in exactly the conditions that prevent grass from establishing properly: shade, moisture, low fertility, and minimal competition from a weak turf.
A new build lawn that develops moss within the first year or two is not failing because of neglect. It is exhibiting the predictable consequence of being laid over inadequate soil on a site that was not properly prepared.
For a full explanation of how moss prevents grass from recovering and why moss treatment must come before seeding, see our guide to diagnosing and fixing lawn problems.
The lawn has never been fed properly
Builder turf is laid and then largely left. Developers are not in the business of lawn care programmes. New homeowners are often given no guidance on what the lawn needs or when. The standard advice to "water it in and it will settle" is not wrong but it is incomplete.
A new lawn over poor soil needs phosphorus-rich fertiliser to support root development, and it needs it early, with a suitable lawn feed often helping with that initial nutrition. Left unfed on inadequate subsoil, the grass has no nutrient reserves and no ability to develop the root depth that creates resilience. The lawn looks progressively thinner and more patchy as the initial growth energy from the turf's commercial preparation depletes, because poor subsoil leaves it short of water and nutrients needed for stronger establishment.
Inherited lawns from previous owners have their own history
Not all new house lawns are builder turf on new build sites. Older properties with lawns that have been neglected or mismanaged by previous owners present a different but equally common set of problems.
The most frequent inherited lawn problems in older properties are heavy moss accumulation from years of under-maintenance, severe thatch buildup from grass clippings never being collected, compaction from years of foot traffic without aeration, and embedded annual weeds that have spread through repeated mowing rather than treatment.
In these cases the underlying soil is often better than a new build site but the surface layer is too degraded to respond to surface treatments alone. The fix is the same: renovation before maintenance.
How to Diagnose What Specifically Is Wrong
Before applying any treatment, identify which problems are present in your lawn. Most new house lawns have several simultaneously.
Test for compaction
Push a garden fork into the lawn with moderate pressure. A fork is useful for a quick compaction check, but aeration machines give better results when you actually need to relieve compaction. In healthy soil it should penetrate to 15cm without significant resistance. If it resists noticeably above 10cm, you have compaction that needs addressing before seeding, and if the fork is hard to push in or twist, that is a practical sign the soil is hard to dig and heavily compacted.
New build lawns almost always have compaction. Assume it is present and plan aeration as part of the renovation.
Test for thatch and moss
Press your hand flat onto the lawn surface. A spongy, bouncy feel rather than a firm one indicates significant moss or thatch, and bare patches often show up in these moss-heavy or thatchy zones where seed struggles to contact the soil surface. Pull back a handful of surface material and look at what you have: dense green or brown mat with minimal soil contact is moss. A brown spongy layer between grass blades and visible soil is thatch.
Assess topsoil depth
Cut a cross-section of turf with a spade in a non-visible area. The distance between the grass surface and the start of noticeably different soil (paler, harder, more compacted) is your topsoil depth. Less than 10cm is shallow. Less than 5cm is very shallow and may need topsoil addition before renovation produces lasting results.
Check drainage
Observe the lawn during or after heavy rain, as drainage issues are often most obvious on wet clay soils. Water that pools on the surface for more than 30 to 60 minutes indicates poor drainage from compaction or clay subsoil. French drains can redirect water away from the lawn to prevent waterlogging and improve drainage. A soakaway is another common drainage solution for New Build Gardens where water has nowhere to go. This needs addressing through aeration and potentially hollow-tine treatment before renovation.
The Correct Way to Fix a New House Lawn
The mistake most new homeowners make is applying surface treatments to a lawn that has structural problems. Feeding a lawn that is compacted and mossy produces minimal improvement. Seeding over moss produces seed that cannot germinate properly.
The correct approach is to address the structural problems first, then renovate.
Step 1: Treat moss across the full lawn (Week 1)
Apply a moss killer to the complete lawn area, not just the visibly patchy sections. POWER, the moss treatment in the GREENER Transformation Kit, is applied in week one and left for 7 to 14 days until the moss blackens and dies back.
This step is essential and non-negotiable. Any seed applied before moss is cleared cannot make proper contact with the soil. For new build lawns where moss has established over compacted subsoil, thorough moss treatment before renovation is the step that makes everything else work.
Step 2: Hollow-tine aerate compacted areas (Week 2)
For new build lawns specifically, hollow-tine aeration before scarification is strongly recommended. A hollow-tine aerator removes small cores of soil, opening channels into the compacted subsoil so air and water can reach the soil beneath more easily without breaking the lawn surface excessively. Deep aeration is usually best done in October or November when conditions suit the work. This is the most effective treatment for the compaction that causes most new build lawn problems.
Hollow-tine aerators can be hired from most tool hire centres for approximately £40 to £60 per day. For a standard garden lawn this is one of the most valuable investments you can make in the renovation.
After aeration, fill the channels with a sandy topsoil or fine lawn dressing. This improves drainage capacity in the aerated zones, and a soil improver or sandy dressing can be brushed into the holes to support better structure and drainage.
Step 3: Scarify and clear (Week 2 to 3)
Run a scarifier across the lawn in two directions to remove dead moss, thatch, and surface debris. Rake up and remove all debris from the surface, leaving it clear for better grass growth from the new seed.
For lawns with very shallow topsoil (under 5 to 7cm), consider topdressing with a fine topsoil or lawn dressing after scarification to improve the growing medium and create better growing conditions before seeding. Spread it thinly (no more than 1cm) and rake level.
Level any low spots with fine lawn dressing. A smooth, even surface with good soil contact across the renovation area gives the seed the best possible conditions.
Step 4: Apply grass seed, feed, and boost simultaneously (Week 3)
Apply LAUNCH professional grass seed, GROWTH mycorrhizal fertiliser, and BOOST liquid seaweed biostimulant on the same day. Not across separate days, because this combined approach gives faster visual thickening than spacing applications out, even though seed renovation does not deliver instant results.
LAUNCH uses a professional perennial ryegrass mix formulated for UK conditions. Unlike the annual ryegrass in builder turf, LAUNCH establishes a persistent perennial root system that improves year on year rather than thinning out, with the aim of building a healthy lawn through deeper, longer-lasting root development.
GROWTH contains mycorrhizal fungi that begin forming root support associations from the moment of germination. For a new build lawn over compacted subsoil where root development is already limited, mycorrhizal support at germination is particularly valuable. The fungi dramatically extend the root system's effective reach in conditions where roots cannot penetrate deep independently.
BOOST liquid seaweed biostimulant applied on the same day provides natural plant hormones that accelerate cell division and improve stress tolerance. New build lawns face more stress than established gardens: variable soil quality, compaction, and often exposed aspects with limited shade. Biostimulant support at germination gives new seedlings the best possible start in these conditions.
Use a lawn spreader for even seed and fertiliser coverage. Apply BOOST diluted in water with a fine spray.
Step 5: Water consistently for 3 to 4 weeks
Water morning and evening, aiming to give new lawns five litres per square metre daily in dry weather, then adjust based on rainfall and soil moisture. New build sites are often more exposed and drier than established gardens, so the surface can dry quickly even when the soil below still feels slightly damp. Do not allow the soil to dry out completely at any point in the first 3 to 4 weeks post-germination.
For a full week-by-week guide to what to expect after seeding, including the ugly phase that most guides do not warn you about, see our lawn renovation timeline guide.
Step 6: First cut at 5 to 6cm
When new grass reaches 5 to 6cm, mow for the first time at a height of at least one inch, using your mower's highest setting if needed. Avoid cutting more than 25% of the grass height at once. Gradually lower the mowing height across subsequent cuts.
What to Expect and When
New build lawn renovation follows the same timeline as standard renovation, with the caveat that compacted soil conditions may produce slightly slower germination in the most compacted zones, and those areas may also stay wetter for longer, so progress can look uneven across the lawn.
Germination visible: 7 to 14 days from seeding. Meaningful coverage across bare areas: 4 to 6 weeks. Full establishment with good root depth: 8 to 12 weeks, although reaching good shape usually happens from the following spring onward rather than immediately after germination. Significantly improved resilience versus original builder turf: from the following spring onwards.
The perennial ryegrass in LAUNCH will continue to improve year on year, thickening through tillering and developing progressively deeper root systems that the original builder turf was never capable of producing.
What Happens After the Renovation
Once the renovation is complete, a seasonal care programme prevents the lawn from declining back to its previous condition. The most common mistake after a successful renovation is returning to no maintenance, which allows moss and thatch to re-establish over the following year or two.
The GREENER Seasonal Care subscription delivers the correct treatments quarterly, calibrated to UK seasonal conditions. Spring feeding for green-up and density. Summer treatment for drought resilience. Autumn renovation support. Winter hardening. For a new build lawn that has been properly renovated, consistent seasonal care is what produces the thick, green lawn that the original builder turf never delivered.
For guidance on what to apply and when through each season of the year, see our summer lawn care guide and our autumn renovation guide.
Fix Your New House Lawn for a Healthy Lawn Properly
The GREENER Transformation Kit contains everything needed to renovate a new build or inherited bad lawn: POWER moss treatment first, then LAUNCH perennial seed, GROWTH mycorrhizal fertiliser, and BOOST seaweed biostimulant applied simultaneously on day one of growth.
Professional-grade formulations. The correct sequence. Applied in under an hour.
Results visible in 4 weeks. Backed by a 60-Day Money Back Guarantee.
Available for lawns from 100m² to 500m².
Frequently Asked Questions
Why is my new build lawn so patchy?
New build lawns are patchy for structural reasons: builder-grade annual ryegrass turf laid over compacted construction subsoil with minimal topsoil depth. The grass thins out within 12 to 18 months because annual ryegrass varieties do not develop persistent root systems, and the compacted subsoil prevents deep root penetration regardless of how well the surface is maintained.
Can I fix a new build lawn without professional help?
Yes. The correct renovation sequence, applied with a complete kit containing professional-grade products, produces results equivalent to a professional renovation for a fraction of the cost. The renovation requires approximately one hour of application across two sessions, plus aeration which can be done with a hired hollow-tine aerator.
Why does my new build lawn have so much moss?
Moss establishes rapidly in new build lawns because the conditions that result from poor soil preparation are ideal for moss. In persistently wet, weak turf, crane flies can also become a secondary problem because their larvae, leatherjackets, damage grass roots. Compacted soil with poor drainage, thin grass coverage, and low fertility give moss exactly what it needs to spread and prevent grass from competing effectively. Moss treatment must come before any renovation work begins.
Should I reseed or lay new turf on a bad new build lawn?
Reseed in almost every case. Fresh turf may look appealing in a new garden, but new turf laid over the same inadequate compacted subsoil will produce the same problems within 12 to 18 months. Reseeding, if the ground below is properly prepared first, as part of a proper renovation sequence, including aeration to address compaction and moss treatment before seeding, addresses the underlying causes rather than replacing the symptom.
When is the best time to renovate a new build lawn?
Late August to mid-October is the optimal window. Soil temperatures are still warm from summer, moisture is more consistent than spring, and weed competition is lower. This is also the most common time new homeowners notice how poor their lawn looks after the summer growing season highlights the patchy, thin, mossy areas. For a full timing guide, see our best time to renovate a lawn guide.
How long after moving in should I renovate the lawn?
As soon as you are in the right seasonal window. There is no benefit to waiting. Moss and thatch will continue to accumulate, and the compacted soil will not improve on its own. If you move in during spring, renovate in April or May. If you move in during summer, plan for the September window. If you move in during autumn, act immediately if you are within the late August to mid-October window.
My new lawn looks worse after renovation. Is that normal?
Yes. Scarification removes the visible surface layer and exposes bare soil. The lawn looks significantly worse than before renovation for the first 2 to 3 weeks. This is correct. By weeks 4 to 6 the improvement is typically dramatic. Do not intervene during the ugly phase. For a full week-by-week explanation of what to expect, read our lawn renovation timeline guide.


